3. Install Xerolite
Follow these steps to download, install, and launch XeroLite on your computer or VPS.
3.1: Download Xerolite
What this does: You're getting the XeroLite software package so you can run it on your machine or VPS.
Why it matters: Without the correct package for your OS (Windows or Linux), XeroLite won't run. Mac is not supported.
Download Location
Download the latest version of XeroLite from the official download page: XeroLite Downloads & Resources
Make sure you have completed the Preparation steps before downloading.
Download Steps
- Visit the XeroLite Downloads & Resources page
- Select the appropriate version for your operating system:
- Windows: Download
win v1.2.0(or latest version) - Linux: Download
lin v1.2.0(or latest version)
- Windows: Download
- Click the Download button for your platform
- Save the
xerolite-xxxx.zipfile to your preferred location
Verify Download
After downloading, verify that you have the complete package:
- The zip file should be named
xerolite-xxxx.zip(where xxxx is the version number) - Ensure the download completed successfully
You'll know it worked when: You have a single zip file (e.g. xerolite-1.2.0.zip) with no errors.
3.2: Install Xerolite
What this does: You're unpacking the XeroLite files so the run script and config can be used.
Why it matters: XeroLite runs from these extracted files. Don't run it from inside the zip.
Extract the Package
- Extract
xerolite-xxxx.zipto your preferred location - Verify required files are present:
win-run.bat(Windows) orlinux-run.sh(Linux) ormac-run.sh(Mac)config/folderbin/folder
Installation Location
Choose an appropriate location for installation:
- Windows:
C:\xeroliteorC:\Program Files\xerolite - Linux:
/opt/xeroliteor~/xerolite - Mac:
/Applications/xeroliteor~/xerolite
Verify Installation
After extraction, verify the following files and folders exist:
- Run script for your platform (
win-run.bat,linux-run.sh, ormac-run.sh) config/directorybin/directoryjre/directory (Java Runtime Environment)
You'll know it worked when: You see the run script and config/, bin/, jre/ folders in your install directory.
3.3: Launch Xerolite
What this does: You're starting XeroLite so its webhook is listening and you can log in in the browser.
Why it matters: Until XeroLite is running, TradingView alerts can't reach it and you can't configure TWS connection or license.
Windows
-
Open Terminal: Press
Win + R, typecmd, and press Enter -
Navigate: Change to the XeroLite directory:
cd C:\path\to\xeroliteReplace
C:\path\to\xerolitewith the actual folder path where you extracted XeroLite.Example: If you extracted it to Downloads:
cd C:\Users\YourName\Downloads\xerolite-xxxx -
Run Program: Execute the run script:
win-run.bat
Linux
-
Open Terminal: Press
Ctrl + Alt + T -
Navigate: Change to the XeroLite directory:
cd /path/to/xeroliteReplace
/path/to/xerolitewith your actual path.Example:
cd ~/Downloads/xerolite-xxxx -
Make Executable: Make the run script executable:
chmod +x linux-run.sh -
Run Program: Execute the run script:
./linux-run.sh
Mac
-
Open Terminal: Press
Command + Space, type "Terminal", and press Enter -
Navigate: Change to the XeroLite directory:
cd /path/to/xeroliteReplace
/path/to/xerolitewith your actual location.Example:
cd ~/Downloads/xerolite-xxxx -
Make Executable: Make the run script executable:
chmod +x mac-run.sh -
Run Program: Execute the run script:
./mac-run.sh
Mac Users: First-time Java Execution
If you encounter a security warning:
- Navigate to
/jre/binin the XeroLite directory - Right-click
java→ Open - Click "Open" on the security warning
- Close terminal and rerun
./mac-run.sh
Verify Launch
After launching XeroLite:
- Check Console Output: The console should display startup messages
- Check Generated Credentials: Default login credentials will be printed in the console
- Verify Port 80: Ensure no errors related to port 80 are displayed
Access the Login Page
Once XeroLite is running:
- Open your web browser
- Navigate to one of the following:
localhosthttp://localhosthttp://127.0.0.1
- You should see the XeroLite login page
Important: Port 80 Access
For TradingView webhook access, ensure:
- Port 80 is not blocked by firewall
- No other application uses port 80
- Cloud service allows port 80 traffic
Test accessibility from another device by entering your server's IP address in a browser.
You'll know it worked when: You see the XeroLite login page at http://localhost or your server's IP address, and the console shows no errors about port 80.
Check Generated Login Credentials
Default credentials are generated and saved in config/login-credentials.properties
First time startup, the generated credentials will be printed out in the console.
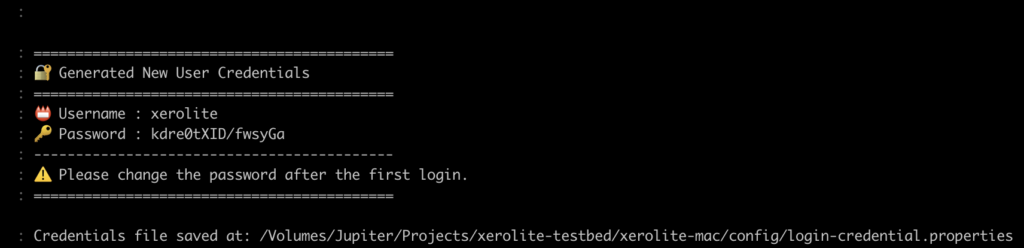
Security Note: Change default credentials after first login by editing config/login-credentials.properties. You can open this file with Notepad (or any text editor) to view your current username and password and update them as needed.
Next Steps
After successfully launching XeroLite, proceed to:
- Activate XeroLite License – Activate your license key
- Configure IB TWS for API Access – Set up TWS API settings
Need more help? Contact support at [email protected]
See also:
- Activate XeroLite License for license activation
- Before You Start for prerequisites
- Troubleshooting Guide for installation issues