SSL Certificate
This guide explains how to run XeroLite over HTTPS using an SSL/TLS certificate.
XeroLite is an application that runs on your local machine. You can secure it either:
- By putting a reverse proxy such as Nginx/Caddy in front of XeroLite and letting the proxy handle HTTPS, or
- By enabling HTTPS directly in the XeroLite using a keystore.
Use this guide if you need to:
- ✅ Access XeroLite via
https://from your browser - ✅ Expose XeroLite over your LAN or the internet
- ✅ Comply with security policies that require SSL/TLS
Table of Contents
- Overview
- Which Setup Should I Use?
- Option 1: SSL via Reverse Proxy
- Option 2: Enable HTTPS Directly in XeroLite
- Troubleshooting
- Summary
- Related Documentation
Overview
By default, XeroLite runs as an HTTP service on a local port (for example http://127.0.0.1:80).
However, you may want HTTPS when:
- You access XeroLite from another machine on your network
- You expose XeroLite behind a public domain name
- Your company or compliance rules require encrypted traffic
XeroLite does not issue certificates by itself. You must either:
- Use a reverse proxy that terminates SSL (recommended), or
- Provide a Keystore (
.p12/.jks) and enable SSL inside the application.
Which Setup Should I Use?
1. Reverse Proxy Handles SSL
Use this when:
- ✅ You have or can set up a web server (Nginx, Caddy, Apache, Traefik, etc.)
- ✅ You want automatic renewal via Let’s Encrypt or a similar service
- ✅ You may host multiple services on the same machine and domain
In this setup:
- Browser ↔ HTTPS ↔ Reverse Proxy ↔ HTTP ↔ XeroLite
2. XeroLite Handles SSL
Use this when:
- ✅ You want a simple single-process setup with no additional web server
- ✅ You already have a certificate + private key and are comfortable with keystores
- ✅ XeroLite runs on a single machine and you can manage certificates manually
In this setup:
- Browser ↔ HTTPS ↔ XeroLite
Option 1: SSL via Reverse Proxy
This is the most flexible and production-friendly configuration. The reverse proxy is responsible for:
- Terminating HTTPS
- Managing certificates (including automatic renewal)
- Forwarding traffic to XeroLite over HTTP
You can use any reverse proxy. Example use Nginx, but the same ideas apply to Caddy, Apache, or Traefik. Details Reverse proxy setup step is out of the scope here.
Option 2: Enable HTTPS Directly in XeroLite
This option enables SSL inside the Xerolite.
You provide a Keystore (.p12) that contains your certificate and private key.
Step 1: Create or Convert a Keystore
You need a PKCS#12 keystore file.
Assume you already have the certificate downloaded from a public CA:
cert.pemprivkey.pem
Convert an Existing Certificate + Key to PKCS#12
If you already have a certificate and key (for example from your company CA), you can convert them:
openssl pkcs12 -export \
  -in cert.pem \
  -inkey privkey.pem \
  -out xerolite.p12 \
  -name xerolite
You will be asked to set an export password — this will be the keystore password.
You will get keystore files named xerolite.p12 in this case
Step 2: Place the Keystore inside the Xerolite installation folder
- Copy
xerolite.p12into your XeroLite installation directory (the same folder where you normally run XeroLite). - Make sure the user account that runs XeroLite can read the keystore file.
- Note the absolute or relative path to the keystore and the password you set.
Step 3: Change XeroLite configuration with SSL Parameters
Changing the config/config.yml by add in and specify the value below
server:
  port: 443
  ssl:
    key-store: file:./xerolite.p12
    key-store-password: YOUR_KEYSTORE_PASSWORD
    key-store-type: PKCS12
    key-alias: xerolite
Example:
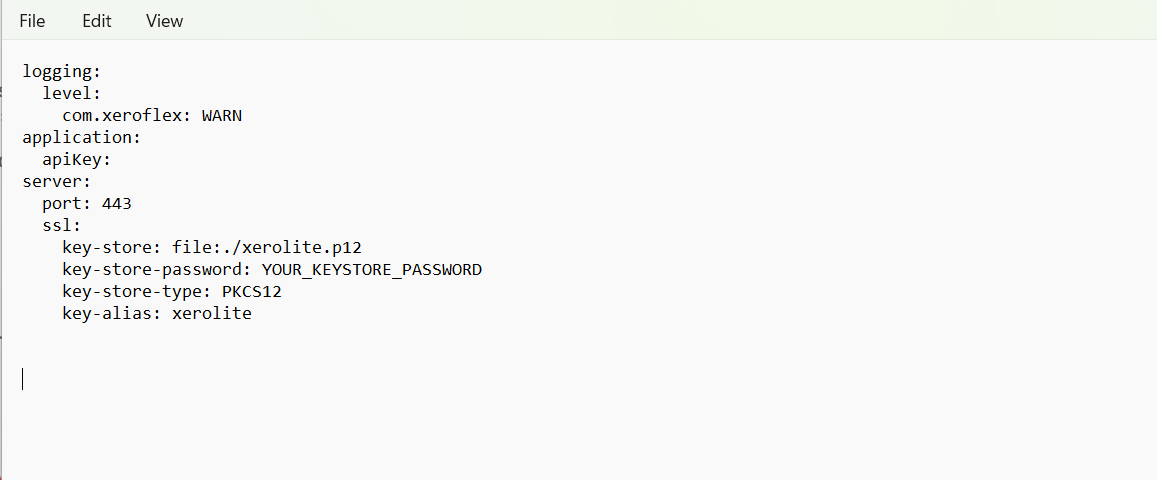
⚠️ Pay close attention to the syntax and indentation in your config.yml. Even a small mistake in spacing or formatting can cause XeroLite to fail to start.
Notes:
server.port— HTTPS port XeroLite will listen on (commonly443if allowed).server.ssl.key-store— path to the keystore file.server.ssl.key-store-password— password you set when creating/exporting the keystore.server.ssl.key-alias— alias used when generating/converting the key (e.g.,xerolite).
Step 4: Restart Xerolite and Open Https in Your Browser
- Open
https://your-domain:443(or your chosen host and port) in your browser. You should able to access Xerolite with https enable.
If you later expose XeroLite over your network, make sure the hostname in the certificate matches
what users type in the browser (for example yourxerolite.your-domain.com or your-domain.example.com).
Troubleshooting
Browser Says “Connection Not Secure” or “Certificate Not Trusted”
Possible causes:
- Self-signed certificate not trusted
- Hostname in the certificate does not match the URL you opened
- Intermediate certificates missing (for non-Let’s-Encrypt or enterprise CAs)
What to check:
- Verify that the CN / Subject Alternative Name in the certificate matches the host you are using.
- If using a company CA, ensure the CA root certificate is installed on your machine.
- For reverse proxies, ensure you are using the full chain file (not only the leaf certificate).
Cannot Reach XeroLite Over HTTPS
Possible causes:
- Reverse proxy not running or misconfigured
- Firewall blocking port
443 - XeroLite not listening on the expected HTTP/HTTPS port
What to check:
- Confirm XeroLite is reachable over HTTP on its internal port (for reverse proxy setups).
- Check Nginx/Caddy logs for errors after reload.
- Ensure your OS firewall or security software allows inbound connections on the HTTPS port.
- Verify that the SSL command-line flags (or configuration properties) are spelled correctly.
TradingView Alerts or Webhooks Stop Working After HTTPS Change
If you change the public URL, port, or protocol:
- Update all external systems (TradingView, other clients) to use the new HTTPS URL.
- Verify that the reverse proxy (if used) correctly forwards to XeroLite.
- See Webhook URL & Settings and
Troubleshooting Guide for more details.
Summary
With SSL/TLS configured:
- ✅ Your XeroLite UI is accessible over HTTPS
- ✅ Traffic between browser and XeroLite is encrypted
- ✅ You can safely expose XeroLite within your network or behind a public domain
Use a reverse proxy for most setups (especially with public domains and automatic renewal).
Use direct HTTPS in XeroLite if you prefer a single-process setup and are comfortable managing keystores.
Related Documentation
- Installation Guide — Install/upgrade XeroLite versions
- Webhook URL & Settings — External webhook configuration
- Troubleshooting Guide — Common issues and solutions
- Glossary — Definitions of terms like SSL, webhook, and port